In this article 11 sections
- Why stitch count alone under-quotes
- The cycle is your cost unit, not the piece
- The run-minute formula, line by line
- Worked example: 48 structured caps on a 6-head
- Same stitches, very different jobs
- What one machine minute costs you
- Checking your stitch-band prices against the minute
- Calibrate your seconds with a stopwatch
- Digitising and the re-quote rule
- Your one-page embroidery job costing sheet
- A next step for this week
You quoted a cap order from the stitch count, the price looked fine, and the job still ran far longer on the machine than the quote allowed for. The stitch count was right. The quote missed everything the machine does when it is not stitching: trimming, changing colour, waiting on a head with a thread break, and stopping while you swap frames.
The short answer for embroidery job costing is to cost by the machine minute, not by the stitch. Turn stitches into run minutes for each cycle, add the time for trims, colour changes, breaks, frame loading and setup, then charge every minute at what your machine really costs to run. Once you have that number, you can check whether your stitch-band prices still pay. A worked 48-cap job and a one-page sheet to copy follow.
Why stitch count alone under-quotes
Stitch count is the number of stitches a design needs, and it rightly drives a lot of pricing because it drives machine time and thread use.
An embroidery machine maker’s UK production calculator says production time depends “not only on the number of stitches, but also significantly on the number of thread cuts and color changes” (production calculator).
So two logos with the same stitch count can take very different times. A clean one-colour wordmark and a five-colour crest with lots of separate elements might both come in at 8,000 stitches. The crest trims more and changes colour more.
The cycle is your cost unit, not the piece
On a multi-head machine, you are not paying for one cap at a time. You are paying for a cycle: one run of the design across every head. A 6-head machine stitches six caps per cycle, and the cycle ends when the slowest head finishes. One head stopped for a thread break or a bad hoop holds back the other five.
Forty-eight caps on six heads is exactly eight cycles. Fifty caps needs nine, and the ninth cycle takes the full cycle time to finish two caps. If you divide 50 by 6 and get 8.3, you have under-costed the job.
An embroidery equipment distributor, writing in GRAPHICS PRO, put it simply: “Embroidery is based on stitch count, average production capacity, and the number of heads you run.” The piece advises building in a conservative buffer and tracking real output to get an average pieces-per-hour figure for scheduling (GRAPHICS PRO, 2019).
The run-minute formula, line by line
A quick estimate uses one blanket multiplier: stitches ÷ stitches per minute × cycles (pieces ÷ heads, rounded up), then multiplied by a single allowance for everything that is not stitching. Take 1.5 as an illustrative figure, not a standard. One blanket figure is either too generous for simple designs or too thin for busy ones, because it ignores how many trims and colour changes the design actually has.
The better method breaks non-stitching time into lines you can see and change:
| Line | What it covers | Where your figure comes from |
|---|---|---|
| Stitching minutes | Stitches ÷ realistic speed for this garment | Timed runs on your own machine, not the brochure maximum |
| Trim time | Trims × seconds per trim | Trim count from the design file; seconds from a stopwatch |
| Colour change time | Colour changes in the design file × seconds per change (colours minus 1 only if each colour runs in one block) | Colour-change count from the design file; seconds from a stopwatch |
| Running allowance | Thread breaks, bobbin changes, a head holding up the cycle | A percentage you calibrate against real jobs |
| Frame load time | Only the part of swapping frames that stops the machine | Time it; if a second person hoops ahead, only the swap counts here and their labour is costed separately |
| Setup | Loading the design, threading, test sew, sign-off | Once per job, not per cycle |
Put together:
Minutes per cycle = (stitching minutes + trim minutes + colour change minutes) × (1 + allowance) + frame load minutes
Job minutes = cycles × minutes per cycle + setup minutes, where cycles = pieces ÷ heads, rounded up.
Trim and colour change times vary by machine, so the only numbers that belong in your sheet are the ones you have timed on your own machines.
Worked example: 48 structured caps on a 6-head
Worked example
All figures are illustrative and rounded for display. Replace each one with your own.
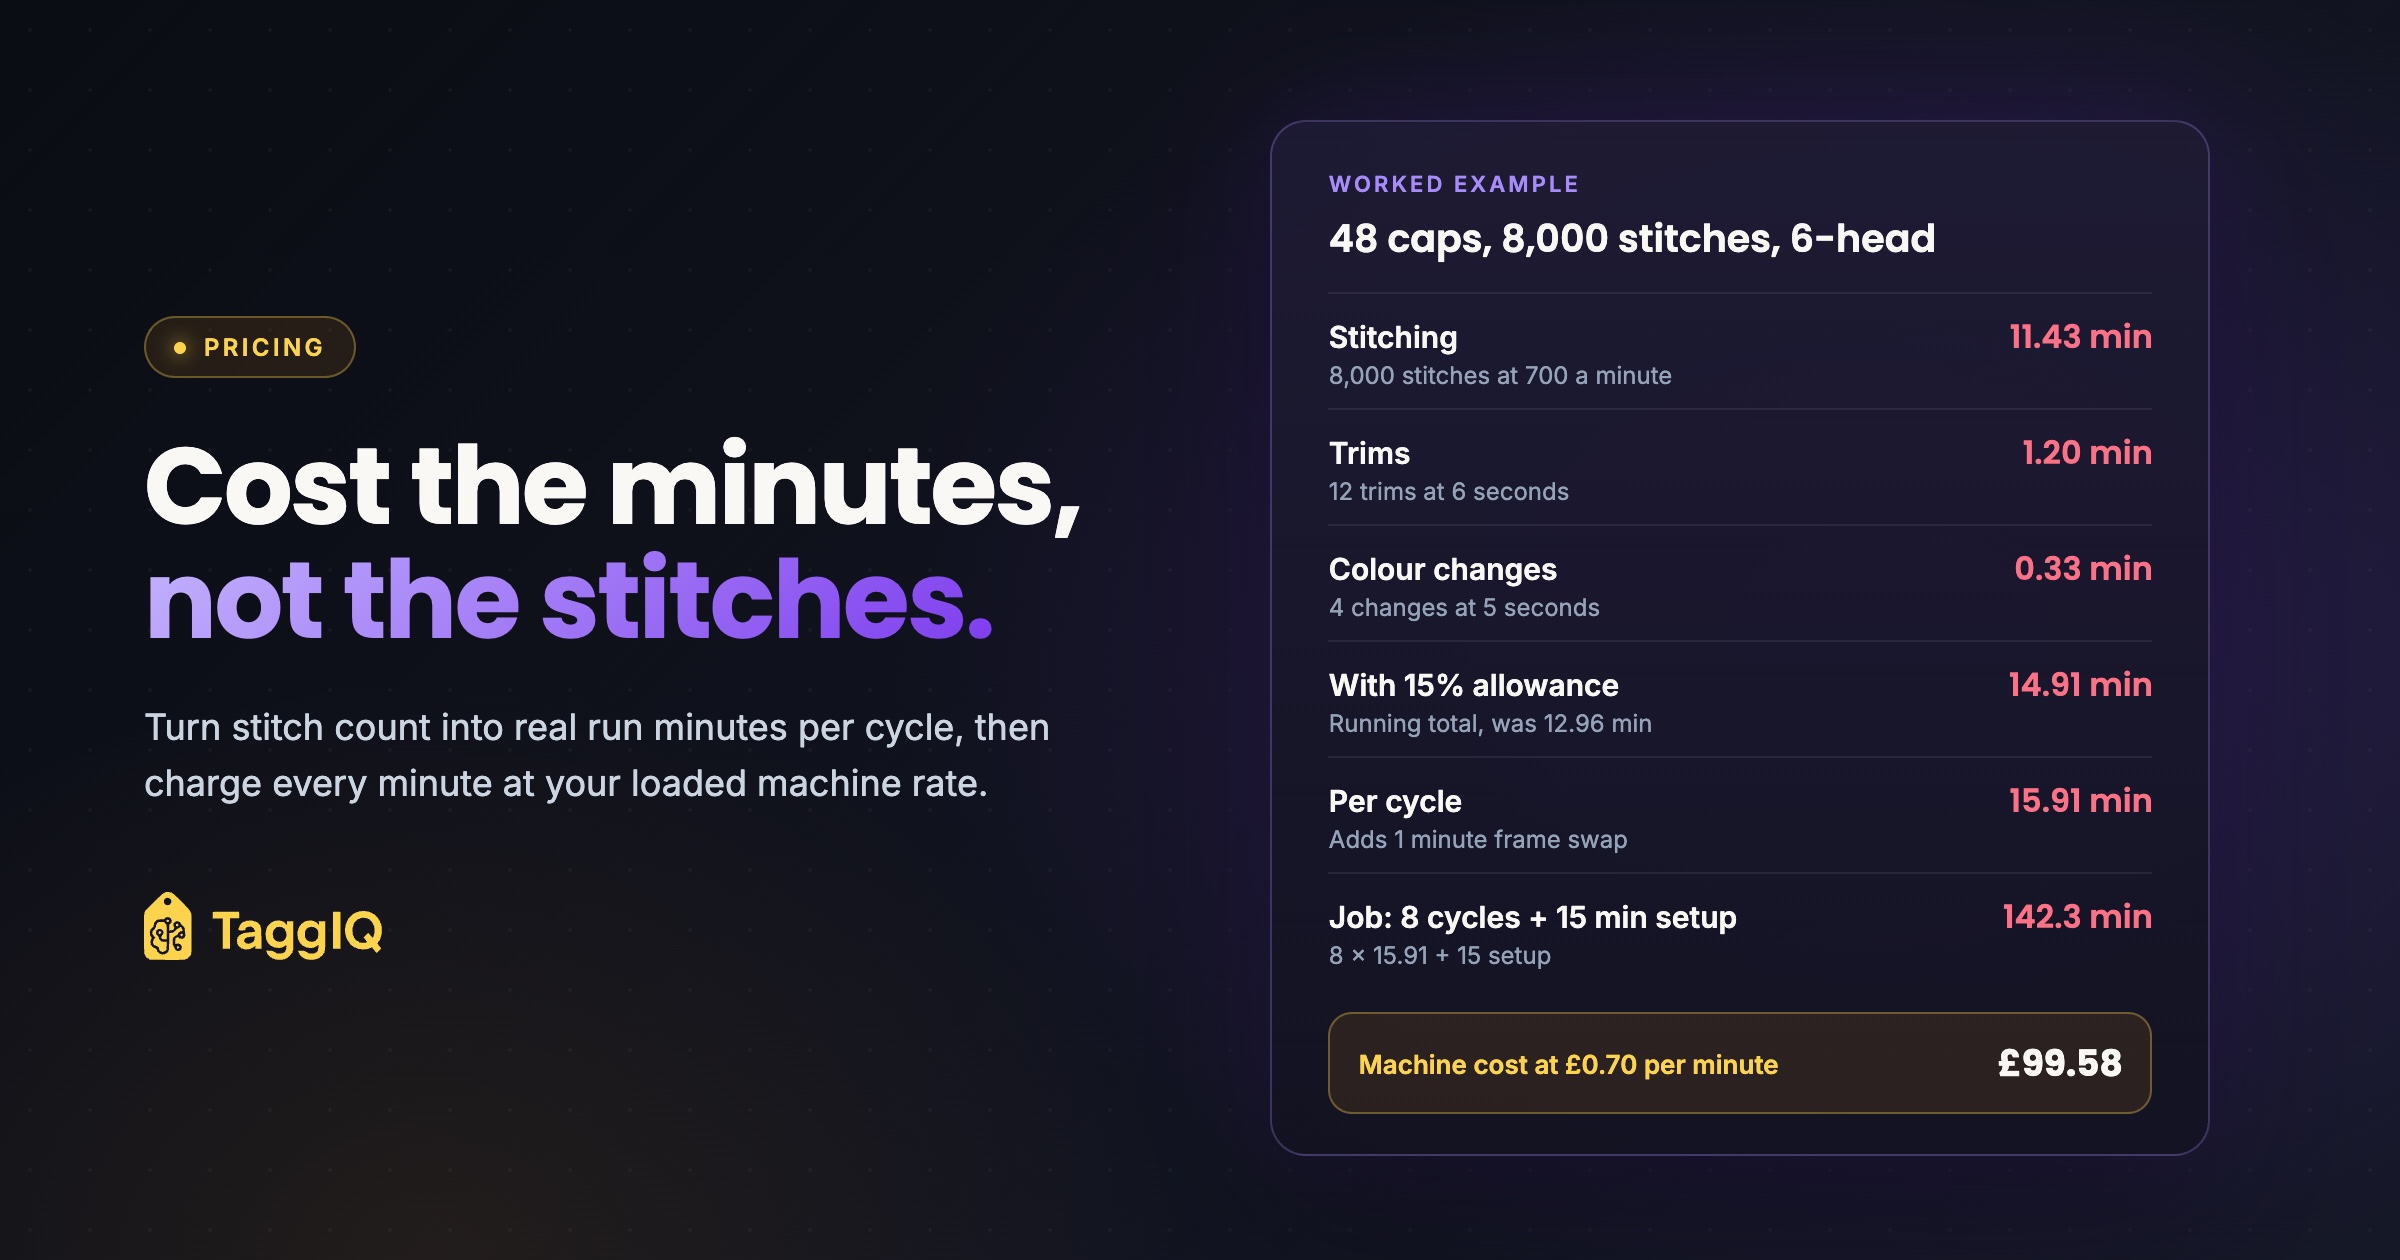
Job: 48 structured caps, front position, 6-head machine, so 8 cycles of 6. Design: 8,000 stitches, 5 colours with no repeats (4 colour changes), 12 trims. Realistic cap speed: 700 stitches per minute. Trim: 6 seconds. Colour change: 5 seconds. Allowance: 15%. Frame swap that stops the machine: 1 minute per cycle. Setup: 15 minutes.
Stitching: 8,000 ÷ 700 = 11.43 minutes. Trims: 12 × 6 seconds = 72 seconds = 1.20 minutes. Colour changes: 4 × 5 seconds = 20 seconds = 0.33 minutes. Subtotal: 12.96 minutes. With 15% allowance: 14.91 minutes. Plus frame swap: 15.91 minutes per cycle.
Job: 8 cycles × 15.906 = 127.25 minutes, plus 15 minutes setup = 142.25 machine minutes.
At a loaded rate of £0.70 per machine minute, machine cost is £99.58, or £2.07 per cap. Thread and backing at £0.15 per cap add £7.20. Caps and the digitising fee are separate lines.
Notice that the frame swaps and setup alone add 23 minutes to this job. On a job of about 140 minutes that is the kind of time a per-1,000-stitch rate never sees.
Same stitches, very different jobs
Now hold the stitch count at 8,000 and change only the trims and colours. Everything else stays as in the worked example.
Worked example: three 8,000-stitch designs, 48 caps
Illustrative figures, using the same speed, allowance, frame swap, setup and £0.70 per minute rate as above.
Simple wordmark (1 colour, 2 trims): 14.37 minutes per cycle, 129.98 job minutes, £90.99 machine cost, £1.90 per cap.
Club crest, the job above (5 colours, 12 trims): 15.91 minutes per cycle, 142.25 job minutes, £99.58 machine cost, £2.07 per cap.
Busy multi-element badge (9 colours, 30 trims): 18.36 minutes per cycle, 161.88 job minutes, £113.31 machine cost, £2.36 per cap.
Same stitch count, and the busy badge costs about 25% more to run than the wordmark.
If your price table only asks “how many stitches?”, these three jobs get the same price. Add a colour-change band and a trim band, or a “high trim” flag, so the busy badge prices above the wordmark.
What one machine minute costs you
Worked example: a loaded machine-hour rate
Illustrative figures for a 6-head machine with one operator.
Operator: £14.00 per hour wage plus employment on-costs (employer contributions, pension, holiday cover), taken here as £17.50 per hour. Machine: £30,000 written off over five years at 1,500 productive hours a year, so £4.00 per hour. Needles, maintenance and power: £2.50 per hour. Share of shop overhead (rent, rates, admin, software) spread over the same productive hours: £18.00 per hour.
Loaded rate: £42.00 per machine hour, or £0.70 per machine minute across all six heads. That is about £0.12 per head-minute.
Three cautions keep this honest. First, the UK National Living Wage for workers aged 21 and over is £12.71 per hour from 1 April 2026 (GOV.UK). Treat that as a legal floor, not a target, and check your own employment cost obligations with your accountant. Second, if overhead is already inside the per-minute rate, do not add an overhead percentage on top of the quote as well; that counts it twice. Third, materials (caps, thread, backing) and the digitising fee are job costs, so they sit on their own lines and never inside the minute rate.
Use productive hours in the divisor, not hours the doors are open. A machine that stitches 25 hours in a 40-hour week has to recover its costs over those 25 hours.
Checking your stitch-band prices against the minute
If you price by stitch band or per 1,000 stitches, with a minimum per piece or per order, the cost per minute is how you check the bands still work.
Worked example: does the band still pay?
Illustrative. Your 6,001 to 10,000 stitch band for 48+ caps is £3.00 per cap for embroidery.
Club crest: £2.07 machine + £0.15 materials = £2.22 cost, leaving £0.78 per cap. Busy badge: £2.36 + £0.15 = £2.51 cost, leaving £0.49 per cap.
Now the part-cycle trap. At 50 caps, the ninth cycle runs 15.91 minutes for two caps, so 50 caps take the same machine time as 54. The band still pays across the job (about £2.21 machine plus £0.15 materials per cap), but those last two caps cost about £5.57 each in machine time. Set quantity breaks or a part-cycle charge in multiples of your head count, and keep a minimum order charge for genuinely small runs.
Rerun this check whenever your rate changes. A band set before the April 2026 wage rise, or your last rent or overhead increase, may now be leaving less margin than you think. For a wider view of where setup and run charges hide margin, see decoration pricing and the hidden margins in setup and run charges.
Calibrate your seconds with a stopwatch
- Pick a design with a known stitch, trim and colour-change count from the design file, on the garment type you quote most.
- With the frames already loaded, time a clean test sew from start to the last head finishing. If a thread breaks, start again.
- Time a one-colour, low-trim design the same way on the same garment, and divide its stitches by the timed minutes. That is your realistic speed.
- Divide your test design’s stitches by that realistic speed, not the dial setting, and subtract the result from the timed run. Split what is left between trims and colour changes using a test file that isolates each, such as a design with many trims and one colour.
- Repeat on caps and on flats, and keep a separate realistic speed for each garment type you quote.
- Over the next month, log actual minutes on real jobs, breaks and slow heads included, against your estimate. That log sets your running allowance: adjust it until the two agree.
Digitising and the re-quote rule
Stitch count is often estimated before the design is digitised and confirmed afterwards. When the file comes back much denser, or with far more trims than you assumed, rerun the sheet before production starts. Decide in advance the change in job minutes at which you go back to the customer, so the decision is not made in a hurry on the shop floor.
The digitising fee is a one-time setup charge for turning artwork into a stitch file, usually not charged per item. Keep it as its own line on the quote. A fee that is waived or forgotten is a cost the shop absorbs.
Your one-page embroidery job costing sheet
Copy this into whatever you quote from and fill in your own figures. For more than one position, fill in one block per position (its own cycles, frame swaps and any re-setup) and add the blocks together.
| Field | Your figure |
|---|---|
| Garment type and position | |
| Pieces | |
| Heads running | |
| Cycles (pieces ÷ heads, rounded up) | |
| Stitches (estimated, then confirmed after digitising) | |
| Realistic speed for this garment (stitches per minute) | |
| Trims × seconds per trim | |
| Colour changes (from the design file) × seconds per change | |
| Running allowance % | |
| Frame swap minutes per cycle that stop the machine | |
| Minutes per cycle | |
| Setup minutes | |
| Job minutes | |
| Loaded cost per machine minute | |
| Machine cost | |
| Extra hooping labour (second person, only if not in the minute rate) | |
| Materials per piece | |
| Digitising fee (separate line) | |
| Your stitch-band price × pieces | |
| Margin left |
A next step for this week
Time one cap job and one flat job on each machine, and work out your loaded rate per minute. Then run your last five embroidery quotes through the sheet. If any came in under cost, you know which bands, minimums or trim rules to change first.
Once the figures are right, keep them visible. TaggIQ keeps stitch count pricing assumptions on embroidery quotes and orders, and treats the digitising fee as a setup cost on the quote and order so it is not missed. The run-minute sum itself still comes from your sheet.
See TaggIQ for embroidery See how TaggIQ keeps stitch count assumptions and digitising fees on your embroidery quotes and orders.
Frequently asked questions
Can I use a flat 1.5 multiplier for embroidery run time?
A flat multiplier is a stopgap if you have no timings yet, but it treats a one-colour wordmark and a nine-colour badge the same. Use it for a week while you time your machines, then replace it with separate trim, colour change and allowance lines.
If someone hoops the next set while the machine runs, do I still count frame time?
Count only the part that stops the machine, such as taking frames off and putting the next set on. Hooping done in parallel adds no machine minutes, but the second person still costs money: add their loaded hourly cost to the machine-hour rate, or put hooping labour on its own job line, never both.
Should I show customers a per-minute price?
Usually not. Customers understand per-piece prices with clear setup and digitising lines. The minute rate is your internal check that those prices cover cost.
How often should I recalculate the loaded rate?
Whenever a big input moves, such as a wage increase, a new machine, a rent change or a drop in productive hours. At minimum, check it once a year before your price list is reissued.

Dave
Dave writes for TaggIQ about running a profitable print, promo, sign and embroidery business: costing and estimating, margins, production flow, order workflows, pricing decisions and keeping customers coming back.